Server
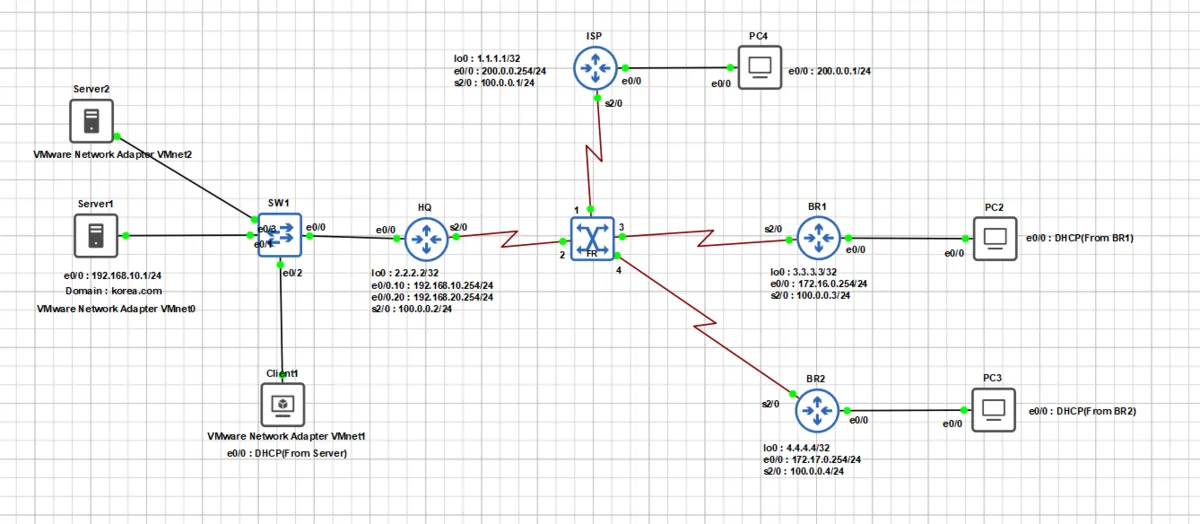
Today's topology
I did things like building DNS and WEB servers and applying SSL.
DNS server
I started with Debian 11.5 (CLI) as the server.
apt install vim bind9
With the command above I installed vim and bind9, which weren't installed. To set basic options, I work in named.conf.options. Edit at /etc/bind/named.conf.options.
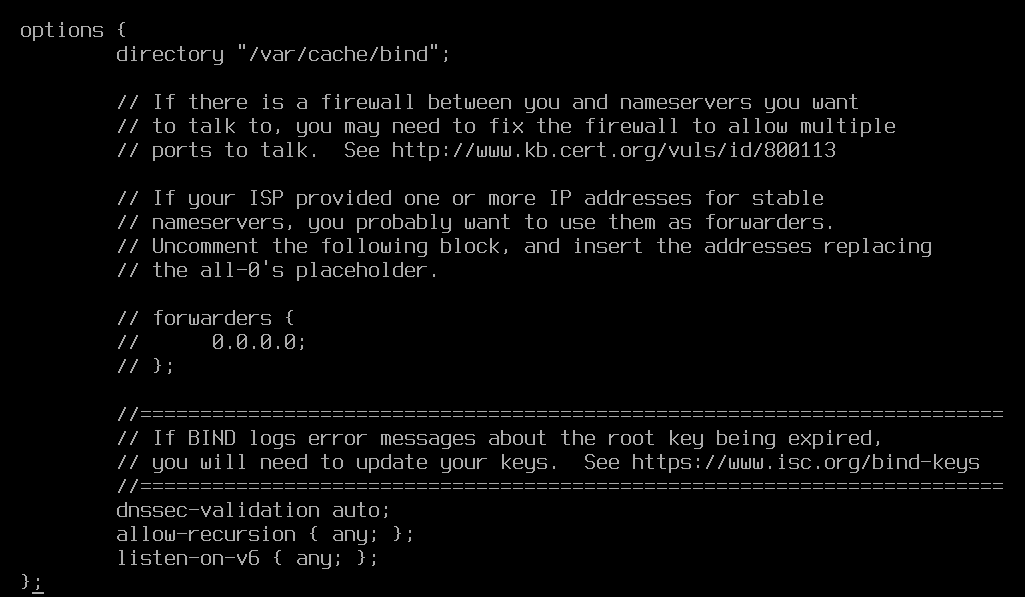
Add only allow-recursion { any; };. Then, at the same path, add to named.conf.local.
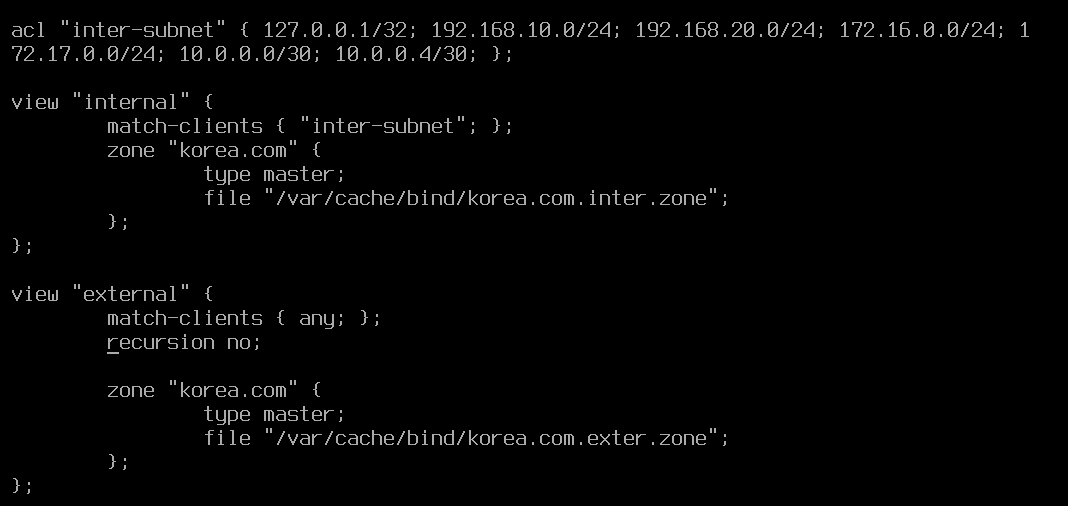
Proceeding by splitting internal and external networks, the ACL above is the set of IPs that know each other's info, based on HQ.
Next, configure the zone file above. First is /var/cache/bind/korea.com.inter.zone. When there's no configuration, writing a relative path goes to /var/cache/bind/[file], so you don't strictly have to write an absolute path.
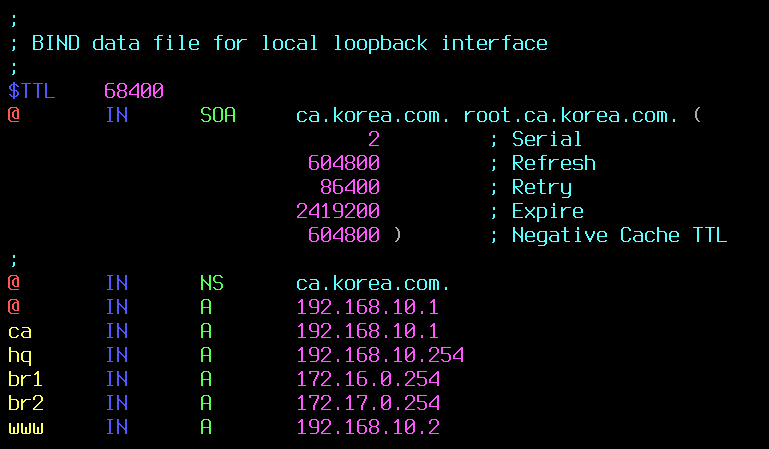
The Domain was done as korea.com. ca, hq, br1, br2 and so on are router devices' IPs, and www is the web server.
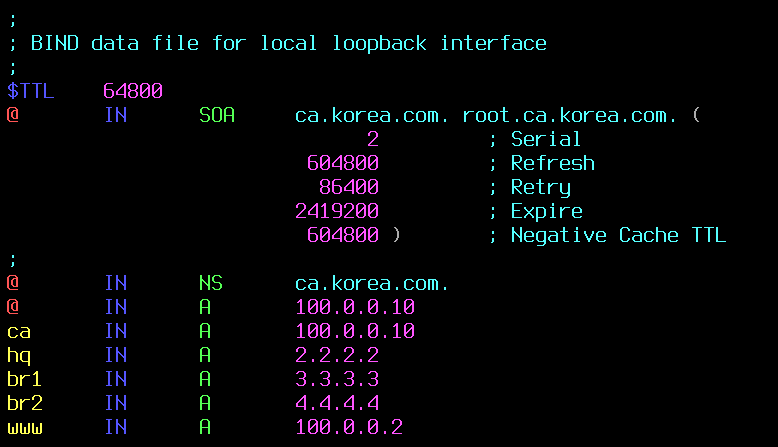
The router devices are each a loopback address, and only the server is the external gateway address.

If everything is configured correctly, you can confirm the IP shows up normally when you enter the command above.
DHCP server
apt install isc-dhcp-server -y
With the command above, additionally install the dhcp server package. Then edit the /etc/dhcp/dhcpd.conf file.

Change the 2 items above to match the DNS we configured earlier.
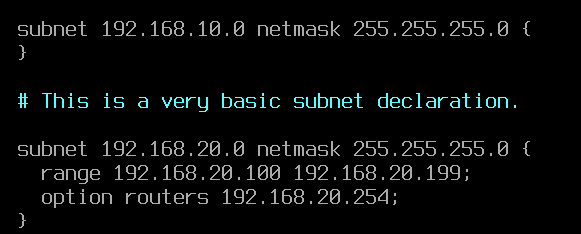
Then decide the address range of IPs to hand out. Restart after this and you're done.
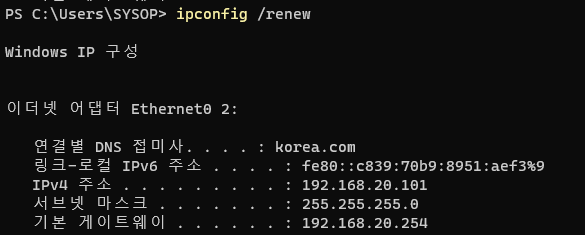
On Windows 11, when pulling DHCP with ipconfig /renew, you can see an IP between 100 ~ 199 is assigned as configured and DNS is correctly caught as korea.com. Ping and DNS queries go through very well too.
Network
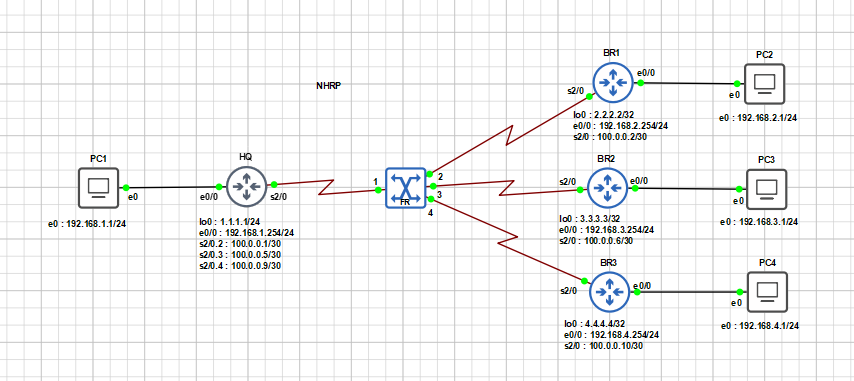
This is the topology to be used in the network. It's a network composed of HQ and 3 zones. It's routed with EIGRP, but since the internal networks and IP ranges differ, currently only routers can communicate and internal PCs cannot. I intend to configure HQ and the remaining zones to communicate using GRE tunnels and DMVPN.
[ HQ ]
1. ip address 10.0.0.1 255.255.255.0
2. ip nhrp authentication [key] # we do not do this
3. ip nhrp map multicast dynamic
4. ip nhrp network-id [number]
5. ip ospf network point-to-multipoint # we use eigrp, so we do not do this
6. tunnel source [loop-back | source interface ip]
7. tunnel mode gre multipoint
8. tunnel key [number]
9. ip nhrp holdtime [seconds, default 7200]
1. Assign the IP to be used on the Tunnel Interface.
2. Enter the key to be used in NHRP authentication.
3. Enable passing multicast traffic through the tunnel. Without this setting, the dynamic routing protocol won't work properly.
4. It's the unique identifier in the DMVPN network, and if it differs, communication is impossible.
5. This changes OSPF's network type. But since we use EIGRP, it's unnecessary.
6. For tunnel source, set an IP that can be routed from outside; that IP is later used in the spoke router's multicast map.
7. Set gre mode to multipoint.
8. When configuring multiple multipoint GREs, set a number to distinguish them.
9. Specify the NHRP map's hold time.
★ Unlike GRE, mGRE has no tunnel-destination setting. Because it's a multipoint structure, the tunnel configuration is formed dynamically.
[BR1]
1. ip address 10.0.0.2 255.255.255.0
2. ip nhrp authentication [key] # we do not use this
3. ip nhrp map multicast [hub router ip]
4. ip nhrp map [hub router tunnel ip] [hub router ip]
5. ip nhrp network-id 1
6. ip nhrp nhs [hub router ip]
7. tunnel source [this spoke router ip]
8. tunnel mode gre multipoint
1. Assign the IP to be used on the Tunnel interface.
2. Specify the key value to be used in NHRP authentication.
3. Enable passing multicast traffic through the tunnel. Without this setting, the dynamic routing protocol won't work properly. Slightly differently from the hub router's configuration, specify the IP address to which multicast will be delivered.
4. This command statically maps the NHS address to the physical one.
5. It's the unique identifier in the DMVPN network, and if it differs, communication is impossible.
6. Set the NHS (Next Hop Server), specifying the hub's tunnel address.
7. For tunnel source, set an IP that can be routed from outside.
8. Set gre mode to multipoint.
★ If you set the ip nhrp map multicast IP to the hub router's tunnel IP, the OSPF neighbor keeps dropping and reconnecting.
When connecting via EIGRP routing, a problem arises. The hub router has a routing table for all spoke routers, but spoke routers don't have routing tables for each other. The reason is Split-horizon.
What is Split-horizon
Split-horizon is the property of not advertising information back out the interface it was advertised in on. (It's enabled for the purpose of preventing loops. But in a hub & spoke segment where the hub is configured with a single interface, you must disable it for spoke routers to be able to exchange information.)
How to disable it
[HQ]
int tunnel0
no ip split-horizon eigrp [number]
Just note down the number you used to connect to the other spokes via EIGRP over the tunnel.
Using a Crypto Profile
- For point-to-point GRE, use the IP address entered with the tunnel destination [tunnel-destination] command to set the ACL and set-peer address.
- For multipoint GRE, since you can't use the tunnel destination command, check the peer NHRP Peer info registered in the NHRP Map to set the ACL and set peer.
- Because the IP packet used in GRE and the IP packet used in IPSec are identical, you must configure IPSec in transport mode so an IP packet isn't attached in front of ESP.
[HQ]
conf t
crypto isakmp policy 1
  authentication pre-share
  encryption aes
  hash sha
  group 14
!

crypto isakmp key [key] address 0.0.0.0 0.0.0.0

crypto ipsec transform-set [transform-set name] esp-aes esp-sha-hmac
  mode transport
!

crypto ipsec profile [crypto ipsec profile name]
  set transform-set [transform-set name]
!

int tunnel 0
  tunnel protection ipsec profile [crypto ipsec profile name]
!
Server - 2 (certificate setup)
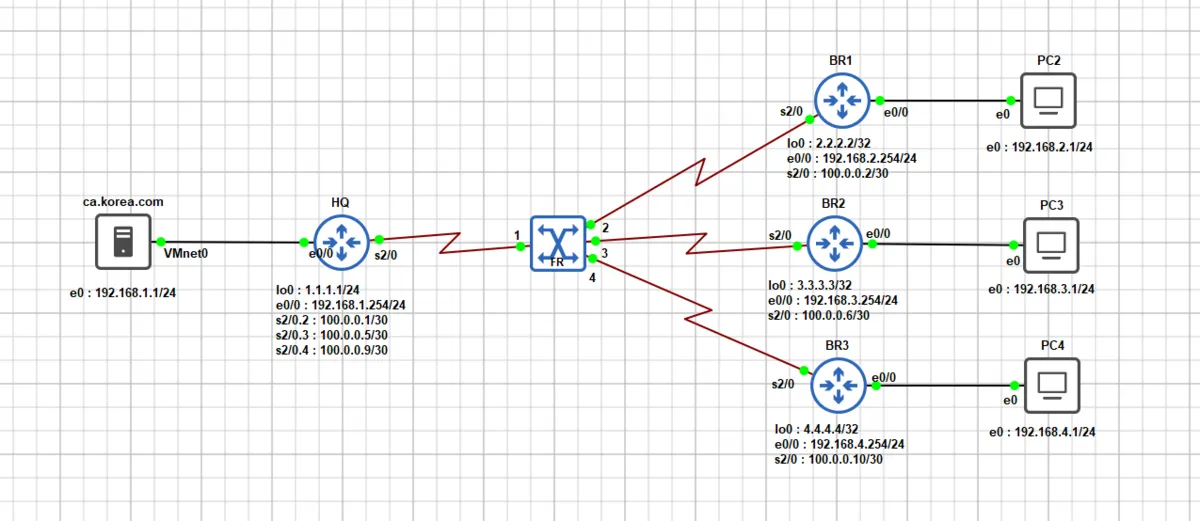
Configure all the explanations above, and on top of that assign the 11.11.11.11 IP to loopback 1 and just set static NAT for ca.korea.com IP -> 11.11.11.11.
ip nat inside source static 192.168.10.1 11.11.11.11
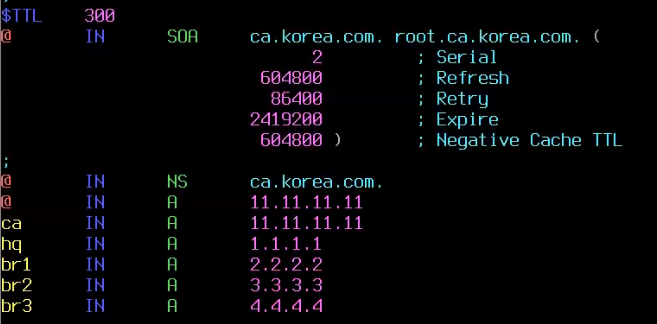
Now, as in the picture above, change the external DNS configuration to match the topology.
[QH]
ip domain-name koera.com
ip name-server 192.168.10.1
ip domain-lookup

[BRn]
ip domain-name korea.com
ip name-server 11.11.11.11
ip domain-lookup
Write the command above to match each router. Then let's send a ping to ca.korea.com from QH and BRn.
HQ#ping ca.korea.com
Translating "ca.korea.com"...domain server (192.168.10.1) [OK]

Type escape sequence to abort.
Sending 5, 100-byte ICMP Echos to 192.168.10.1, timeout is 2 seconds:
!!!!!
Success rate is 100 percent (5/5), round-trip min/avg/max = 1/1/4 ms

BR1#ping ca.korea.com
Type escape sequence to abort.
Sending 5, 100-byte ICMP Echos to 11.11.11.11, timeout is 2 seconds:
!!!!!
Success rate is 100 percent (5/5), round-trip min/avg/max = 9/10/11 ms
You can confirm it works. Now generate the private key at HQ.
BR1(config)#crypto key generate rsa modulus 2048 label hq.korea.com
BR1(config)#do show crypto key mypubkey rsa
% Key pair was generated at: 11:16:04 UTC Nov 16 2022
Key name: hq.korea.com
Key type: RSA KEYS
 Storage Device: not specified
 Usage: General Purpose Key
 Key is not exportable.
 Key Data:
  30820122 300D0609 2A864886 F70D0101 01050003 82010F00 3082010A 02820101
  0096EB32 E01FE12D FDE8A0B5 BF8D8946 6BC4038E 6A475887 7C6D7D12 5C34965E
  4A85B8F3 1475070E 2BD6F884 71CEB2B5 0274981A EC72EB89 C00FBE42 7809F0B1
  1A64CAE4 11DA46D8 C134F19A 13A31858 79E76C5E 873A737E 61C2951E C636992E
  E6A8F4C9 91112879 38D8E1BF 6D4F0B05 FCE4038E 0057E5AF 28A5926D 202C1DEE
  9E2DF748 FA5E0195 57EB06A4 B7A5631B 592C2373 6BFC28DD C60378E3 4BBA18C7
  72764B8E 056823CA C0965051 E815A149 25DA8BCA 95E2A1EA B0D1FACF 2F0B544B
  2D944AB5 86D4E5C8 1ED478F9 5651033D D619FDB9 7BEB0A43 873FF837 39F64280
  AE15806C 614C1490 16ED401F 60F720BF D9AF08A1 D5685189 C7340701 482B7322
  87020301 0001
% Key pair was generated at: 11:16:04 UTC Nov 16 2022
Key name: hq.korea.com.server
Key type: RSA KEYS
Temporary key
 Usage: Encryption Key
 Key is not exportable.
 Key Data:
  307C300D 06092A86 4886F70D 01010105 00036B00 30680261 009262AF 24199DF1
  4BE4C0C7 EFBC123F 13F8E55E 017E1D9F 804E6AB5 7F7FB2B8 5C6C5F50 512282BF
  ADAD3AF1 8ADBA977 0FA03545 C521C587 B74A9865 A8C9C4FF 08159C65 44FECDE7
  7583F06F 92272C3B 685907CD 8B1FD048 FD1D3614 30E59295 23020301 0001
You can confirm it was generated fine as above. And whenever encrypting with a server certificate, you must sync the router's current time. So change the QH router's clock to KST +9 hours.
BR1(config)#clock timezone KST +9
BR1(config)#do cl
BR1(config)#do show clock
*20:18:42.325 KST Wed Nov 16 2022
It synced to the current time fine! Now we need to make ca.korea.com a trustpoint.
HQ(config)#crypto pki trustpoint korea-CA
HQ(ca-trustpoint)#enrollment url ftp://ca.korea.com pem
HQ(ca-trustpoint)#subject-name CN=hq.korea.com,C=KR,O=GIFTS

HQ(ca-trustpoint)#rsakeypair hq.korea.com
HQ(ca-trustpoint)#ip-address none
HQ(ca-trustpoint)#revocation-check crl none
HQ(ca-trustpoint)#fqdn hq.korea.com
HQ(ca-trustpoint)#serial-number none
To exchange certificates with the server over FTP, designate the FTP server with enrollment. Here, the trustpoint's korea-CA name must be the same as the Root certificate's name. See the picture below.

Then install vsftpd and ftp on the ca.korea.com server. ftp is installed for testing. Then go into /etc/vsftpd.conf and change some simple settings.
apt install vsftpd ftp -y

Lines 31 and 35 are commented out, so delete those comments. This is because we need to fetch the certificate, so write permission is required. Then also create a user for FTP.
adduser -gecos "" router
There are no typos. You must enter it all. Then type the command ftp localhost and try logging in with the router account.
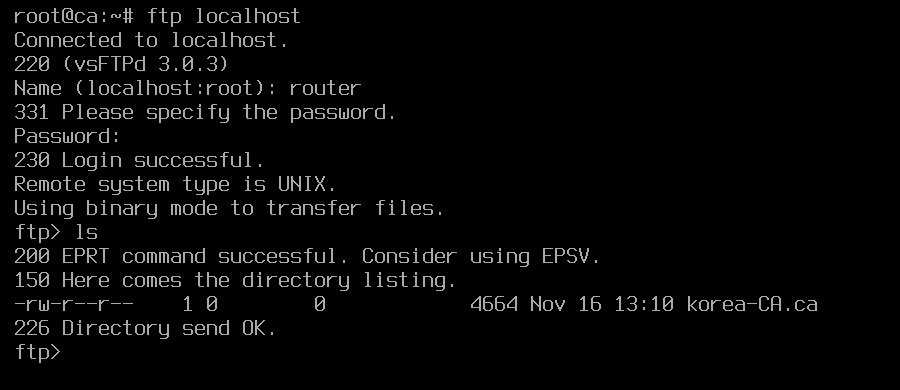
Right now I logged in and typed ls and there's something, but if it's a freshly created account there'll probably be nothing. Anyway, I confirmed it works fine.
HQ(config)#ip ftp username router
HQ(config)#ip ftp password Pa$$worD
At HQ, enter the command above to register the FTP account. Then enter the command below to hand over the key generated on the HQ router.
HQ(config)#crypto pki enroll korea-CA
% Start certificate enrollment ..

% The subject name in the certificate will include: CN=hq.korea.com,C=KR,O=GIFTS
% The subject name in the certificate will include: hq.korea.com
Send Certificate Request to file system? [yes/no]: yes
% Certificate request sent to file system
% The 'show crypto pki certificate verbose korea-CA' commandwill show the fingerprint.

HQ(config)#!
*Nov 16 11:50:18.435: CRYPTO_PKI:  Certificate Request Fingerprint MD5: A8B5DCC3 285EE903 3B2A3ABA CD62A14E
*Nov 16 11:50:18.435: CRYPTO_PKI:  Certificate Request Fingerprint SHA1: 21223EF1 F284BEDD 701DD7C5 11C78563 4CAFCE04
If it shows up in the console window as above, it succeeded. Let's check on the server.

You can see the korea-CA.req file exists. Now use this key to do the CA signing.
openssl ca -in korea-CA.req -out korea-CA.crt
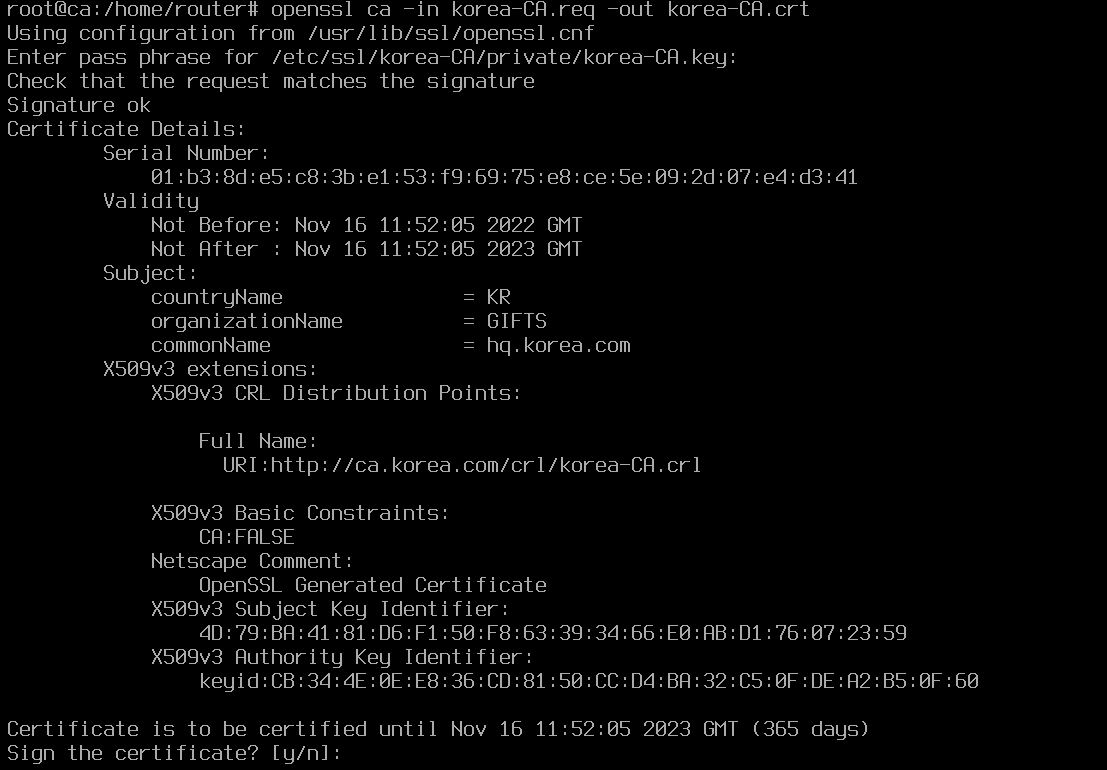
When you press Y at the Sign the certificate? prompt below, it's generated successfully. If entering that password or a total error comes up, please see the post below.

You can confirm the korea-CA.crt certificate was created. Now copy the root korea-CA.crt certificate into this FTP user's current path under the name korea-CA.ca.
!> ****](https://peemangit.tistory.com/125)
— peemangit.tistory.com
Original (Korean): tistory — published 2022-11-15, migrated to this blog. This translation was generated with the help of AI.
